Sunday 21 February 2016

ESET Smart Security 9 Lifetime Crack + Usernames & Passwords + Keys are Here !

ESET Smart Security 9
It is an antivirus and Internet security with the addition of parental controls, anti-spam module, and an intelligent firewall. Offers advanced detection technologies and multi-layered security features. ESET Smart Security 9, is built on ESET’s unique heuristic technology that identifies viruses that have never been seen before. Designed for a low footprint, fast scanning, it packs security features and customization options for consistent and personalized security on- or offline. This enables them to protect your computer proactively, in real-time, against new viruses and cyber threats that conventional signature-based antivirus products don’t catch
How to Activate ? (There are three methods)
Method 1 – (Lifetime)
  1. Install ESET Smart Security 8 & crack it from here : http://solutiondclick.blogspot.com/eset-smart-security-8-lifetime-crack
  2. Install ESET Smart Security 9 over it , your license will be restored
  3. Enjoy Lifetime License !
Method 2 – (Varied License)
  1. Remove any previous versions of ESET Smart Security
  2. Install the v9
  3. Run it and disable real time file system protection
  4. Install & Run TNod Activator
  5. It will automatically insert license (Wait 30 Seconds)
  6. That’s all :)
Method 3 – (Varied License)
1. Install from Setup as Trial
2. Run it & it will ask for activation
3. Then click on I have a username and password. You will be redirected to license converting page.
4. Use license to convert into activation code by pasting your username and password
5. That’s all :)

Friday 19 February 2016

Hotspot Shield 5.20.15 Elite Crack is Here ! [Latest]

Hotspot Shield 5.20.15 Elite
Though Hotspot Shield Elite lets you download and surf without a bandwidth cap, you are limited to seven days before you have to pay. There is a wholly free version, but it’s riddled with ads. Once you’ve registered with Hotspot Shield, protecting your surfing only requires one click and no complicated setup.
After the success of Hotspot Shield 3.42 Elite Crack which got 150k+ downloads we bring you the elite crack of latest Hotspot Shield. It is most efficient & reliable crack of Hotspot Shield ! .
How to Crack ?
  1.  Install Hotspot Shield 4.15.3 & Install update of 5.20.15 as Administrator
  2. Run Hotspot Shield Elite Universal Crack
  3. Click Crack button
  4. A new small window will appear in the crack then click on icon in the window
  5. Wait till it write registry keys
  6. Exit that window & crack
  7. Run Hotspot Shield & You will upgrade to elit
 DOWNLOAD HERE

Hotspot Shield 5.20.15 Elite download

hotspot crack

enjoy


Windows 10 Final All Editions in One (8-in-1) (x86/x64) ISO is Here


Now is the time when many people believe that they know what to expect of Microsoft. Say, will release a “new” operating system, it will call the next sequence number with a minimum of changes, with the rejection of its past innovations. How then .. bam! Microsoft has trumped all. Even notorious Wzor did not expect such a setup. In general, meet the version for review Windooooows, there is no 9. Windows 10!
Windows 10 is familiar and easy to use, with lots of similarities to Windows 7 including the Start menu. It starts up and resumes fast, has more built-in security to help keep you safe, and is designed to work with software and hardware you already have. So Why become late ? Get Windows 10 Final Build on your devices today !
This ISO has these editions of Windows 10
  • Windows 10 Home x86
  • Windows 10 Home x64
  • Windows 10 Pro x86
  • Windows 10 Pro x64
  • Windows 10 Home Single Language x86
  • Windows 10 Home Single Language x64
  • Windows 10 Enterprise x86
  • Windows 10 Enterprise x64
How to Install ?
1. Extract the zip file , Burn the ISO to a DVD or make a bootable flash drive
2. Boot the DVD/USB
3. Follow the Installation by agreeing terms & clicking Next
4. Select Windows 10 Edition you want to Install & click on Next then Wait till it installs

 5. You can activate any edition with our activator
 Windows 10 Final All Editions in One (8-in-1) (x86/x64) ISO is Here
download here iso
download activator

enjoy

Windows 10 Final All Editions Permanent Activator is Here !

Windows 10 Activator – KMSpico/KMSAuto/Re-Loader
So here the wait is over , solutionsclick presents the activator of Windows 10 ! Yes , it can activate Windows 10 for lifetime !
How to Activate ?
If you have tried any other activators you must do a fresh re-installation of Windows 10 before using this activator.Otherwise it will not work and you will end up with no success ! Anyway you can try it if you want.
  1. Disable any virus guards/Firewalls/Windows Smart Screen first
  2. Download and install Activator
  3. Now open ‘KMSELDI.exe’ from  ‘C:Program FilesKMSpico’ folder
  4. Click tokens backup button which is with an arrow facing down icon (click yes in next message box)
  5. After that click Red button
  6. Wait till it says program completed ,activator will close itself ( if it freezes at some point,download and use the alternative KMS Activator we have given below)
  7. Now you are Done !
  8. Check your Windows 10 computer properties :D Activated !!
Restart to remove if watermarks are still there / Do not Uninstall KMSpico from your system !

 03/02/2016 – All activators updated to latest versions.
 

KMSpico 10.2.0 Final + Portable Activator

 Downloud here

KMSpico 10.2.0 Final + Portable Activator 


Internet Download Manager (IDM) 6.25 build 12 Crack is Here

 Note : This crack has a built in update function. Once IDM new version comes, you can update and apply crack right away. (Latest Version 6.25 build 12 is included !)

Internet Download Manager Universal Web  Crack
Internet Download Manager aka IDM developers release a new build of  their well-known Download Accelerator ; Internet Download Manager  regularly. So everybody who uses pirated versions get so pissed off that they have to find a new version of crack every time when an IDM update comes. So we made a really awesome fix for that
An Universal Web Crack. A new era in scene world. Web crack in a new concept of cracks that download and update crack content as the target program gets updated.
So whenever IDM releases a new version.Update your crack using built in updater and apply crack. Easy as that ! You can simply trust on solutionclick IDM crack because it has a history of more than 2 year with regular updates,and also it has more than 1,000,0000 worldwide downloads.
How to Crack ?
1. Install IDM (Any version)
2. Run IDM Universal Web Crack
3. Click Crack button & wait till a message pops
4. That’s all !
What to do when a new version/build of IDM comes ?
1. Update IDM
2. Run IDM Universal Web Crack
3. It will ask to update crack, Update it
4. Crack as usual
How to use the built in Fake Serial Fixer in this crack ?
How to Fix Fake Serial Error ?
1. Click on small yellow warning button at bottom right of crack
2. Use the fixer by trying the three methods
3. Click on Close Fixer
What’ new in this Universal Web Crack ?
✓ Better & Faster Cracking
✓ Inbuilt Crack Update Function
✓ Inbuilt Fake Serial Fix System
✓ Better Update method
✓ Lesser size
✓ Online key synchronization
What’s new in 6.25 build 12 ? (Released : 11 February 2016)


you can Download here


Malware/Virus risk
Many virus guards say that this crack is a virus or some other kind of unwanted program. We can do nothing about that.All we can do is giving a guaranty that solutionsclick do not issue any crack or a program that can harm your computer or your privacy ( we really don’t  got anything to do with your private data 😀 ).But if you are still not mature enough to handle the risk, just purchase the full version of IDM from their purchase page !
If you have any problems on this or found a bug, comment below. Cheers ãƒ„

15 Things You Didn’t Know You Could Do with Dropbox


Just when you thought Dropbox couldn’t get any better, it has.
Many interesting cloud storage services have come and gone, but Dropbox is probably the one that’s been here the longest. And now it has upped its game with a host of new features. Let’s explore some of them from 2015 as well as some old but lesser-known ones. What we’re saying is let’s discover more stuff that you didn’t know you could do in and with Dropbox.

1. Request Files from Anyone

Sharing files saved in your Dropbox has always been easy. Collecting files in Dropbox from people? Not so much. You had to rely on third-party services for quite a long time…until Dropbox introduced its own file request feature. The best thing about it is that you can gather files even from people who don’t have a Dropbox account. No reason to force them to sign up for one, is there?
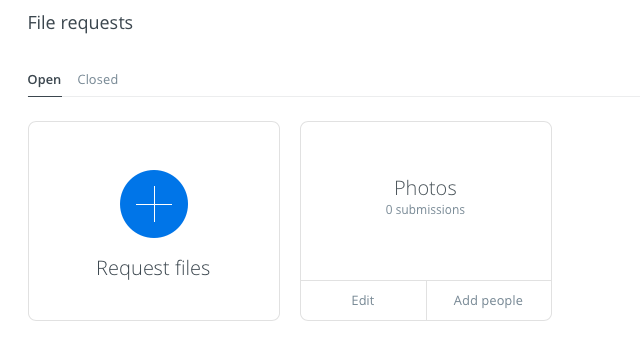
To initiate a file request, first head straight to your Dropbox account and click on File Requests in the sidebar to go to the file requests page. See that big blue plus icon there? Click on it create a file request.

 You’ll have to specify a catchall name for the files that you want to collect. Dropbox creates a new folder with this name to direct the incoming files to. You can also use an existing folder instead.

For every file request that you create, you’ll get a unique link to share with the people you want to receive files from. Ensure that you have enough space in your Dropbox account for the incoming files. Otherwise, the person sending the files will encounter an error message.
Don’t worry about the privacy settings for the received files. Only you can see them, and later share them if and when you want to.

If you’re on the receiving end of a file request, you’ll get an email with a link to upload the requested files. Click on it and Dropbox will walk you through the straightforward upload process. You’ll have to limit the file size to 2GB if you’re sending it to a Dropbox Basic user and to 10 GB if you’re sending it to a Pro or Business user.
We also recommend giving Balloon a try, if you don’t mind ditching the built-in file request feature in favor of a third-party app.

2. Preview Photoshop and Illustrator Files

Has someone shared a PSD file or an AI file with you on Dropbox? You don’t need access to the right Adobe software to preview it. You can do that right from Dropbox’s web interface, thanks to the interactive file preview feature introduced mid-2015.
Click on the file you want to preview and you’ll get an image toolbar that you can use to zone in on any portion of the preview.
You can preview files not only in PSD and AI formats, but also in PNG, JPG, EPS, SVG, and BMP. But, the previews for certain formats like PSD, AI, and SVG will be sharper and clearer than for the rest. The file preview feature also allows you to preview PDFs, slideshows, videos, and more.


If you’re a creative professional, the preview feature ensures that you don’t have to worry about compressing high-resolution files or converting them to other, more easily viewable formats for sharing with clients. Share a Dropbox link to the design file and be done with it. Your client can preview the file (in full resolution!) and leave feedback on it from Dropbox on the web.

3. Rejoin Shared Folders

Let’s say you left a shared folder, accidentally or otherwise, by deleting it from your Dropbox, and now you want back in. Regaining access to that folder is as simple as clicking on Sharing in the sidebar and then clicking on the Rejoin link next to the folder you want fresh access to.
rejoin-shared-folder
Remember, deleting files inside the shared folder works differently from deleting the shared folder itself. The former will make the files disappear from everybody’s else Dropbox account as well, but then again, anyone with access to the shared folder can restore them.

4. Find Files Faster with Dropbox Recents

You don’t have to dig through folder after folder to find a Dropbox file that you just edited. You’ll find a link to it under Recents in the sidebar. This section keeps an updated list of files that you have opened or modified recently. Share, download, comment, delete, or even view previous versions of the file straight from this list.
dropbox-recents

5. Work as a Team

Many Dropbox users — solopreneurs, for example — use the Basic and Pro versions of Dropbox for business. If you’re one of those users, congratulations. You can now collaborate better on projects using the new Team feature.
After you create a team, you’ll be able to add members to it, share files and folders with them, and create sub-folders for better organization. As the team administrator you get granular control over file and folder permissions. Also, you’re sure to appreciate the ability to link your work and personal Dropbox accounts and switch between them easily without having to log out of either.
Your work projects are not the only ones that can benefit from this collaboration feature. Personal projects also can. Have a family vacation coming up? Or a wedding? Or a friend’s birthday? Create a Dropbox team and get started on the planning!

6. Discuss Files You’re Viewing

You have probably noticed that Dropbox files on the web now come with a commenting mechanism. If you haven’t, shift your attention to the right sidebar when you have a file or file preview open, and there it is.
As is standard procedure on the web these days, you can @mention someone to get their attention, and in this case, to get their inputs on the file. They’ll receive an email notification about it and can leave a comment on the file even if they aren’t a Dropbox user.
comments-section
The added advantage is that if it’s a Microsoft Office file that you’re discussing, you can edit it right there based on the feedback, thanks to the Dropbox-Office Online integration. Your edits will automatically get saved back to Dropbox.

7. Sync Files Faster

By default, Dropbox limits the bandwidth allocated to the files being uploaded to your account. If you want to take advantage of your network’s higher capacity, you can remove this limit altogether or set a custom one from Dropbox’s settings.
To remove bandwidth limits for file uploads on a Mac, first open Preferences from Dropbox’s menu bar icon.
Next, switch to the Network tab and click on the Change Settings button next to Bandwidth: Now select the radio button next to Don’t limit, or if you want to specify a limit, select the radio button next to Limit to and type in an upload speed. You can also limit the download rate from the same section. Hit the Update button once you have made the changes.
dropbox-upload-limit
To access the bandwidth settings on Windows 7 and above, click on the Dropbox icon in the system tray and go to Preferences > Bandwidth.

8. Instantly Delete Sensitive Files for Good…

Files that you delete from your Dropbox don’t disappear immediately from your computer or your Dropbox account. They get queued up for permanent deletion and stay part of the Dropbox ecosystem for at least 30 days. The deleted files also stay in the cache folder (.dropbox.cache) within Dropbox’s root folder on your computer for three days.
Note: If you have a Pro account with Extended Version History, the deleted files stay in the online deletion queue for up to one year.
If the files you deleted contain sensitive data, you might want to clear them out from the deletion queue manually. To do so, go to the home page of your account and click on the trash icon to the left of the search box. This displays the deleted files and they appear grayed out.
Now select a binned file that you want to erase permanently and click on the Permanently delete… option in the menu bar at the top. Do this for each file that you want to erase right away. Of course, you can select multiple files using Ctrl on Windows or cmd on a Mac.
dropbox-permanently-delete-files
Here comes another important step: getting rid of the deleted files from Dropbox’s cache folder. You can’t see this folder unless your system is set to show hidden files. You’ll need to access it and once again delete the files from there to get rid of them for good. Of course, if you do nothing, Dropbox will still clear the cache folder in three days’ time.
Based on whether you’re using Windows, Mac, or Linux, you’ll have to look up Dropbox’s instructions to reveal the cache folder on your computer.
Warning: You can’t recover any of the files you have deleted using the steps above, but someone with access to your computer and a good recovery software might be able to.
  1. Be 100% sure that you want to delete a file before you delete it.
  2. Look for a more advanced security solution to remove even the most deeply hidden remnants of deleted files.

9. Add a 4-Digit PIN to the Dropbox App on Your Mobile

You know all about protecting your Dropbox account with two-factor authentication and you have set it up already, right? Have you also secured the Dropbox app on your phone or tablet with a PIN or passcode? The passcode feature is not new, but it’s one that many people overlook.
Set a passcode for the Dropbox app now via Dropbox settings > Advanced Features > Configure Passcode on your Android device or via Dropbox settings > Passcode Lock on your iPhone. For iPads and Windows tablets, here are the instructions to set a passcode.
dropbox-passcode-android
Are you a Pro user? Then in addition to setting a passcode, you can enable the setting to remotely erase all Dropbox data on that device after 10 failed attempts at entering the correct PIN. This can prove helpful if your phone ever falls into the wrong hands. There’s a catch though. You can proceed with the remote data wipe only if the device is online.
Also, if you’re a Basic user, you have to content yourself with unlinking the lost device by clicking on the “x” icon next to its name under Dropbox Settings > Security > Devices.

10. Carry Your Bookmarks Everywhere

Dropbox being such a great way to sync anything, we have all come up with various makeshift ways to sync bookmarks to the cloud. But we don’t need them anymore, because Dropbox has now added a feature to do just that.
You can now drag and drop links to Dropbox on the web or on your computer. They get backed up just like your files do, so you can open them from any location.
dropbox-bookmark
Unfortunately, clicking on a bookmark from Dropbox’s web interface loads a preview page for the bookmark instead of the link suggested by the bookmark. That’s why we recommend using the bookmark’s context menu to open the link in a new tab.
You’ll really appreciate the convenience of this bookmarking feature when you’re collaborating with someone on a project and have a bunch of shared links to keep track of.

11. Host a Podcast from Dropbox with JustCast

We recently shared an exhaustive guide on how to start a successful podcast. If you’re gearing up to start a podcast yourself and are on the lookout for a decent, easy-to-manage podcast host, your search ends here — with JustCast, which is ridiculously simple to use.
Once you connect JustCast to your Dropbox, a folder named JustCast will appear in /Dropbox/Apps. Any mp3 file you add to Dropbox/Apps/JustCast/podcast_name will automatically go in your podcast’s RSS feed. All you have to do is tell people to subscribe to the feed. Use the in-built metrics feature to track the subscriber and download count.
justcast-workflow
To publish the podcast on iTunes, visit this link for podcast submission and paste the link to your RSS feed there to proceed.
Now let’s talk money. You don’t have to shell out any if you’re content having just three of the most recent episodes showing up in the feed. For unlimited feed items, you have the Pro plan at $5/month.
Here’s something you should make a note of. Dropbox has some restrictions in place on file hosting and sharing. So once your podcast gathers momentum and your audience grows, you’ll need to consider upgrading your Dropbox account to keep up with the increasing number of file downloads.
Even if starting a podcast is not in your plans, you can put JustCast to good use by turning it into a personal podcast playlist. Put any MP3 audio files you want to listen to into Dropbox as described above and use the RSS feed in your podcast client — just as you would with any other podcast.
Be mindful of copyright restrictions for any files you’re uploading to Dropbox.

12. Theme Your Dropbox with Orangedox

If you use Dropbox for work, you might want to tweak its interface to align with your brand. And that’s where Orangedox steps in. It gives you tools to add special touches to the Dropbox portal, such as you own logo and color scheme.
Orangedox also allows you to track the documents you have shared and get download stats for them. Note that only this feature is available in the Free Forever plan.
We must admit that Orangedox has not quite picked up steam despite being launched more than a year ago i.e. in 2014. But considering that there seem to be zero apps that allow you to theme Dropbox, Orangedox is still worth a shot.

13. Create Photo Galleries Using Dropbox Photos with Photoshoot

Okay. We admit that we’re cheating a bit here. You already know of apps that turn your Dropbox photos into galleries. But we had to include Photoshoot in this list because it makes the process so easy.
You drag and drop photos into Dropbox and Photoshoot takes care of creating the gallery, complete with items like thumbnails, titles, dates, and a lightbox display. You can leave the gallery visible to the public or hide it behind a password.

Professional photographers will get the most out of Photoshoot. If you are one, you’ll be happy to know that the app gives you options to use a custom domain, add your logo, theme the gallery with your brand’s colors, etc. You can even add links to your social networks.
The verdict is that if you’re looking for a hassle-free and elegant way to show off your best work, you’ll fall in love with Photoshoot. Check out a sample gallery here.

14. Skip File Display and Go Straight to File Download

When you click on a Dropbox link you have received, your browser displays the file and gives you an option to download it. But you can force your browser to start downloading the file immediately instead of displaying it first. To do so, you’ll have to change the dl=0 query parameter in the shared link to dl=1.
Let’s say the Dropbox link reads www.dropbox.com/…/URL.webloc?dl=0. Copy-paste it in your browser, change the dl=0 bit at the end of the link text to dl=1 (www.dropbox.com/…/URL.webloc?dl=1) and then hit Enter. Your browser will begin downloading the file right away.

15. Put Dropbox in a Menu Bar

15. Put Dropbox in a Menu Bar Panel with App Box for Dropbox [Mac]

Want quick access to your Dropbox folders without having to switch to a new Finder window on OS X? The lightweight App Box for Dropbox can help you with that. For $0.99 it places your Dropbox inside a panel that you can display with a single click from the menu bar. Sounds basic? It is. Sounds useful? It’s that too. We wish Windows also had something similar to put the whole of Dropbox in a pop-up panel accessible from the system tray.
Note that there are other similarly named versions of this app in the Mac App Store and they have a similar functionality. It’s not clear if they come from the same developer though. One of the versions is even free. Do your research before you install the app.

What’s in Store for Dropbox in 2016?

From Dropbox tools for the power user to Dropbox etiquette to time-saving Dropbox shortcuts, we poured everything we knew about Dropbox into article after article. And we thought we had covered it all. We were wrong. As you can see, Dropbox is keeping us on our toes and giving us fodder for more articles. We hope it keeps up this pace in future. Happy “Dropboxing”!
by diwakar malik


How to download YouTube videos - save to your PC, laptop, iPhone, iPad or Android device

Here’s how to download those YouTube videos that you want to watch when you don’t have an internet connection. Save videos to your PC, laptop, Android or iPhone / iPad.


There are many ways to download YouTube videos, either using a browser plug-in or simply by pasting the URL of the video into another website. Here we’ll use KeepVid, but Freemake Video Converter and Freemake Video Downloader are also good alternative options if you want a piece of software which can also convert the downloaded videos into other formats (see below for yet another option: ChrisPC Free VideoTube Downloader).
1. Head to www.youtube.com and find a video you want to download. Copy the URL from your browsers address bar. Clicking in the address bar is usually enough to highlight it, but clicking three times should also do the job. Press Ctrl-C to copy the highlighted address.
2. Head to keepvid.com and click in the box to the left of the Download button. Press Ctrl-V to paste your copied URL and click Download. You’ll see the available versions of the video appear below.
KeepVid paste URL

3. From the list, choose the format you want. We recommend MP4 for the best compatibility, and go for the highest quality – in this case it’s 720p. Simply click the link to start the download – ignore the flashing adverts around the page which are not download links at all.


Click download link
4. Look in your ‘downloads’ folder, or click the downloaded video in your browser’s status bar (we’re using Chrome here) to watch the video. You can also copy the file to another computer or transfer it to another device (here's how to convert videos for free using Freemake and Any Video Converter.)
Watch downloaded YouTube video

How to download MP3 music from YouTube

Sometimes you might want to download only the audio from a video on YouTube. The process is almost identical to the one described above, but instead of using KeepVid.com, browse to http://www.listentoyoutube.com/ and paste the URL of the video into the obvious box.
Listentoyoutube.comIf the conversion doesn't happen automatically, click the blue Go button, and you will see the progress. Finally, click the download link when it appears. Then, you can treat the file like any MP3, transferring and synching it to an MP3 player, smartphone or tablet.
For Android devices, simply copy the MP4 files(s) to the appropriate folder, typically Movies, using Windows Explorer. You can then play it back using the Gallery app or another video player.
If you have an iPhone or iPad, import the file into iTunes and then sync it to your iOS device. Alternatively, you can drag and drop the file(s) to your iPhone or iPad via the Apps tab when you click on your devie in iTunes. All you need is an app, such as Good Reader or another video playback app which can transfer files using this method.
Of course, you can download YouTube videos directly to your smartphone or tablet without using your PC, laptop or Mac at all.

How to download YouTube videos directly to your smartphone or tablet - iPhone, iPad and Android

There are many free apps available on Google Play and in Apple's App Store, but we've found that TubeMate is a great choice for Android, while Tube Downloader - Free Video Download (by RoyalDevs) works well on an iPad or iPhone.
All apps work in the same way. They include a web browser, which usually has YouTube, or the mobile version of YouTube, set as the homepage - or a bookmark. You use the browser to find a video you like, just as you would on your PC. When the video starts playing, a message will pop up asking if you want to download (or save) the video. Tap this and the video will be downloaded.
TubeMate for Android - download YouTube videos

Thursday 18 February 2016

8 Reasons to Switch from Windows 10 to Linux

Windows 10 has been out in the wild for a while now. For the most part, people have been really liking it. It’s probably the most streamlined version of Microsoft’s operating system to date. Still, some people aren’t happy with the upgrade and are looking at alternatives.
Introducing Linux: it’s a free and open source platform which many operating systems are built upon. If you’re looking to move from Windows to an alternative, here are eight compelling reasons why you should leave Microsoft for a more free and open source operating system.

There are hardly any operating systems based on the Linux kernel out there that cost money. Sure, some do cost a fee to get them going, but those are enterprise Linux distributions. When it comes to desktop Linux, the price is a modest $0. This is perfect for those who can’t spare the $199 cost to get a full-featured copy of Windows from a big box store.
Yes, there are free programs on Windows too, but most of them are not first-class programs. For example: since Adobe will probably never port Photoshop over to Linux, we have Gimp. Gimp is a huge software project filled with lots of contributors dedicated to making a viable photo editor for the Linux platform (and they also have a Windows version).

One of Linux’s huge strengths is how seriously security is taken. When you install software it is impossible for you to do so without knowingly entering your password. What’s even better is that when you install a Linux distribution, all the software you will ever need is inside servers that are maintained by the developers of the operating system itself. They go through each and every package and verify that it isn’t malicious and even sign them. This removes the ability for malicious software to install itself (like on Windows).
You’d be hard-pressed to find a copy of Microsoft’s latest operating system that can run on something as little as 128 megabytes of RAM. As for Linux, this is totally possible. If you have an aging computer that isn’t compatible with Windows 10, don’t worry! There are Linux projects out there that specifically focus on old hardware. For example: Lubuntu can run on very little RAM yet allows its users to enjoy a modern, clean operating system.

In Windows 10 your privacy is mostly disregarded. A lot of aspects to Windows 10 are less than privacy-friendly. When you use Microsoft’s new operating system, you are telling them that it is okay for them to collect data on you. They harvest information on your device’s location, your calendar data, emails and texts, contact info, and the list goes on. If you’re interested in reading the full write-up on how Microsoft handles your privacy, Christopher Harper has written an article about it here.
If you value your privacy, avoiding Windows 10 is a must. Most, if not all, Linux distributions take your privacy very seriously. You won’t find a bubbly talking assistant on your Linux desktop collecting data and information on you for financial gain. What’s even more important is that if a Linux distribution is found to disregard your privacy, it will be quickly called out by the large community of Linux developers and fixed quickly.
Most, if not all, Linux distributions are made in part by open source technologies. A vanilla installation of your favorite Linux-based operating system likely won’t contain any closed-code programs. This makes it easier to give away the operating system for free, but it also means that modification of the operating system is legally allowed. This means that if you want, you can freely modify your operating system until your heart is content.
If you’re really good at programming, you can even join up with your favorite Linux distribution and contribute to it. All of the code used is open and publicly available for everyone to see, and anything is possible.
linux-customization


Have you ever wanted to change the icons or the way the folders look in Windows? What about the overall way the task bar looks? Maybe you just want to try out a new desktop entirely. On Microsoft’s operating system, this isn’t entirely possible. You’re stuck with the Windows 10 look, and there’s just no getting around that.
On Linux distributions this is not the case at all. You can take apart your operating system, and replace the icons, the desktop theme and nearly anything else you can think of. By doing this it’s possible to take Linux and make it truly unique. The same can’t be said for Windows 10.
Every year the reasons to switch to Linux increase. There’s no doubt that the Linux platform has matured past being an “operating system for hackers” to being something that everyone can enjoy. Hopefully this list will help those unsure of abandoning Windows 10 for a better platform that respects freedom of choice, privacy and software freedom.


17 Windows 10-Specific Keyboard Shortcuts That Every User Should Know

Even though a mouse makes things easier to navigate and interact, I personally like to do things with the keyboard as much as possible. Why? So that I can be much faster and avoid moving my hand constantly to use the mouse. If you are a keyboard user like me, then you will love all the new keyboard shortcuts that are introduced in Windows 10 to access all the new features easily. Take a look at the below list, and you might find a couple keyboard shortcuts that might help you in your daily activities.

1. Win + I – Using this simple shortcut you can quickly open the All Settings window. Since Microsoft is slowly unifying all the control panel items with the modern Settings app, this is one of the most useful shortcuts of Windows 10.

 2. Win + A – One of the best things about Windows 10 is its universal notification center or the action center. Using the keyboard shortcut “Win + A,” you can easily open and see all the current notifications in the panel. There is no need to click on that small icon on the taskbar.


3. Win + S – Cortana, which acts as a personal digital assistant, is one of the biggest additions in Windows 10. To quickly launch Cortana, you can use this keyboard shortcut. When you do, Cortana launches in the keyboard input mode which simply means that you can type in your search query, and Cortana will search for it both in your PC and on the Web.

4. Win + C – This shortcut also launches Cortana, but the difference is that the above shost it launches Cortana in Keyboard input mode, but this shortcut will launch Cortana in the listening mode. This shortcut is quite useful if you haven’t enabled or aren’t using the “Hey, Cortana” feature.
5. Win + Ctrl + D – The addition of Virtual Desktops is one of the best things to happen to Windows 10. Using this quick keyboard shortcut, you can create and open a new virtual desktop.
6. Win + Ctrl + Left or Right Arrow Keys – If you have multiple virtual desktops opened for different works, then use this keyboard shortcut to navigate between the virtual desktops.
7. Win + Ctrl + F4 – You can use this shortcut to quickly close a virtual desktop. Don’t worry – any opened programs in the virtual desktop will be transferred to the main desktop workspace.
8. Win + Tab – This shortcut lets you access the new Task View feature in Windows 10 which displays all your opened programs and your virtual desktops.


9. Ctrl + Alt + Tab – This quick shortcut lets you see all the apps that are currently opened on your desktop. It looks like “Alt + Tab,” but you need to use your mouse or arrow keys to choose the program.


10. Win + Arrow Keys – Window snapping has been greatly improved in Windows  You can use the “Win + Arrow Keys” shortcut to quickly snap windows to any corner of you screen.

11. Win + G – Game DVR is one of the lesser known tools, but it is one of the best video capture tools added to Windows 10. Using this handy shortcut, you can quickly open the Game DVR tool and start recording. Though this tool is particularly aimed at gamers, it can also be used to quickly record other programs. However, you cannot record the entire screen, just a single program window.
12. Win + Alt + G – If you want to quickly start recording the activity in the current program or game window, then use this shortcut. It will launch the Game DVR and start recording the activity of the active window.
13. Win + Alt + R – After starting the Game DVR, you can use this quick shortcut to stop recording the activity in the current program or game window.
In Windows 10, Microsoft made some small but welcome improvements to the good old Command Prompt. Here are some of the shortcuts that are quite helpful in daily activities.
14. Ctrl + A (in Command Prompt) – Most of you know what this shortcut does, select all in the active window. Even in the comment prompt, this shortcut does the same thing, it selects all the text.
15. Ctrl + C (in Command Prompt) – Unlike in the previous versions, you can simply use the general keyboard short “Ctrl + C” to copy the text or the output in the Command Prompt. Alternatively, you can also use the shortcut “Ctrl + Insert.”

16. Ctrl + V (in Command Prompt) – Just like the copy action, you can use the general shortcut “Ctrl + V” to paste text or commands into the Command prompt. Alternatively, you can also use the shortcut “Shift + Insert.”
17. Ctrl + M (in Command Prompt) – Using this shortcut, you can enter into Marker mode so that you can select the text or output using the Shift and Arrow Keys.


how-to-install-windows-10-from-a-usb

solutions click

how-to-install-windows-10-from-a-usb

  If, like us, you have downloaded the Technical Preview for Windows 10, you’ll be itching to try it. But how do you install it from the ISO you’ve just downloaded? Well, read on and find out.
Historically, whether you copied Windows 98 to a directory on your C: drive from DOS called win98.src and installed from there, or created a USB boot of Windows 8 direct from the media’s installer, it’s possible to install the Windows OS from a number of mediums.
So today, what we’re going to do is show you how to take an 8GB USB disk (4GB can be used for the 32bit edition), prep it for installing Windows 10, transferring the files to it and booting from it. While not a new process, we’ll try to cover as much as possible, just to give you a bit of flexibility when going through this process.
First, let’s prep the USB pen. For this, we’ve used a generic USB2 disk and are currently doing this on a Windows 8.1 Pro client. We're using the 64bit Technical Preview. Plug it in to your desktop/laptop and let’s get started! Oh, and be prepared to lose any data on the USB disk, so back it up first if necessary.

  1.Open a command prompt window as an administrator

  2.Click/press Start, type CMD, right click on the (likely) first result and choose     Runas administrator
In the command prompt window, type diskpart and press enter

3.Once at the diskpart command prompt, type list disk and press enter

A.You will see a DOS format table listing your available disks.
b.Make sure you know what disk is the USB. We know due to the size (7633MB) and that it’s not highlighted as a Gpt disk/partition.


5.At the diskpart command prompt, type select disk 2 and press enter

a.Replace our disk number with yours.
6.At the diskpart command prompt, type clean and press enter

 7.At the diskpart command prompt, type create partition primary and press enter.
8.At the diskpart command prompt, type format fs=ntfs quick and press enter.


9.At the diskpart command prompt, type active and press enter.
10.At the diskpart command prompt, type assign and press enter. 

a.This assigns the next/first available drive letter for the USB disk.
11.At the diskpart command prompt, type list volume and press enter.

a.This is how you can confirm the drive letter assigned to the USB disk, in our case F
12.At the diskpart command prompt, type exit and press enter, but don’t exit the command prompt

 At this point we’ve prepped the USB disk for the Windows 10 files and folders. But we need to copy the files to the USB disk. Depending on what OS you’re performing this on (XP, Vista, 7 or 8/8.1) the process will differ slightly. As we’re on Windows 8.1, we’ll detail that process, with additional info thrown in for good measure.
1.Download the Windows 10 Tech Preview if you haven’t already
click here 32bit
download here
2.64bit click here
 download here

2.Browse to the downloaded ISO in Windows Explorer, right click the file and choose Mount 

a. Once mounted, it should open in Explorer automatically (D drive in our case)
    b.If not, just browse, using Explorer, to your USB disk (again ours is F)
3.Select all files/folders using the mouse or CTRL+A , right click on the highlighted area and choose Copy (or CTRL+C)

 a.You can also choose Send to and then your Removable Disk
        If you chose to send to the USB disk, skip to step 5
4.Open you (empty) USB disk in Explorer and right click the white space and choose Paste (or CTRL+V)

5.Wait for the process to finish and close all Explorer windows once done (you’re at the mercy of the speed rating on the USB disk we’re afraid).

If you don’t have Windows 8/8.1 to mount an ISO, WinRAR will extract contents of an ISO to any location, or you could use a third party tool to mount the ISO(s) like Daemon Tools. Whatever way you can, or know how to, take the ISO contents and place it on your USB disk will be fine.
The next thing for you to do is to modify the USB disk for booting. Up until now, it’s still only a non-bootable USB Windows 10 installer.
1.Go back to the command prompt window you shouldn’t have closed
2.Type the following command  - d:\boot\bootsect.exe /nt60 f: and press return
 

a.Ensure you replace the d: and f: drive letters with your mounted ISO media and USB disk respectively

3. Type exit to close the command prompt window
All that you need to do now is remove the USB media from your computer, plug it into the device you wish to test Windows 10 on, and boot from it. With a bit of luck, you’ll see something like the image below on screen!
 

 he above processes will work to create any Windows USB install media, from Vista right up to Windows 10. So if you’re still clinging onto Windows 7 SP1, use this guide to create your USB media.

Hopefully the longest process will have been the downloading and/or the copying of the ISO and it’s files to the media. While we know how to run through the process quite quickly, prepping the media from the command line should take no more than 5 minutes.

One final thing to note is that if you want to remove Windows 10 from the media and put Windows 7 or 8.1 on there, plug the USB media into the computer where you have 7 or 8.1 media (DVD, ISO, etc), delete all the files/folders from said USB media using Windows Explorer, and copy the 7 or 8.1 files/folders from the ISO or DVD to the USB disk. Simple!